
This tutorial will show you how to build and program a self-balancing LEGO MINDSTORMS EV3 robot that can drive around a room. You can build and program BALANC3R (left) or Gyro Boy (right). Once your robot is up and running, you’ll be challenged to customize the construction and program to invent your own self-balancing robot.
Step 1: Building a robot
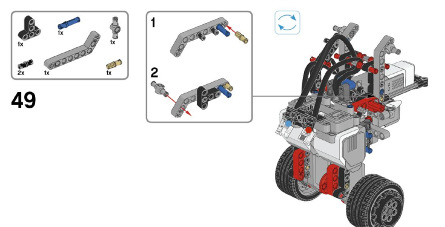
To begin, choose the robot you want to build, and follow the respective step-by-step building instructions.
Requirements for BALANC3R:
- 1x LEGO MINDSTORMS EV3 Home Edition #31313
- 1x Gyroscopic Sensor (learn more)
- Click to go to the building instructions.

Requirements for Gyro Boy:
- 1x LEGO MINDSTORMS EV3 Education Core Set #45544
- Click to go to the building instructions.
Click to build Gyro Boy
Step 2: Installing the EV3 Gyro Sensor block
If you’re using the LEGO MINDSTORMS EV3 Home Edition Software, you’ll need to install the EV3 Gyro Sensor block before you can program your robot.
- Follow the steps in this article to install the block.
- If you’re using the LEGO MINDSTORMS EV3 Student Edition, this block is already installed.

Step 3: Download the balancing robot project
- Right-click this link, click “Save Link As,” and save the project file to your computer.
- Launch the EV3 programming software, and open the downloaded project file.
Before you run the programs, let’s briefly examine how they work. The project includes four example programs, two for each robot:
- BALANC3R-Basics: Balance in place, turn right, and turn left
- BALANC3R-RemoteControl: Control the robot with the infrared remote
- GyroBoy-Basics: Balance in place, turn right, and turn left
- GyroBoy-AvoidObstacles: Drive around while avoiding obstacles
Each program consists of two configuration blocks, a balance loop, and a drive control loop, as shown in the figure below.
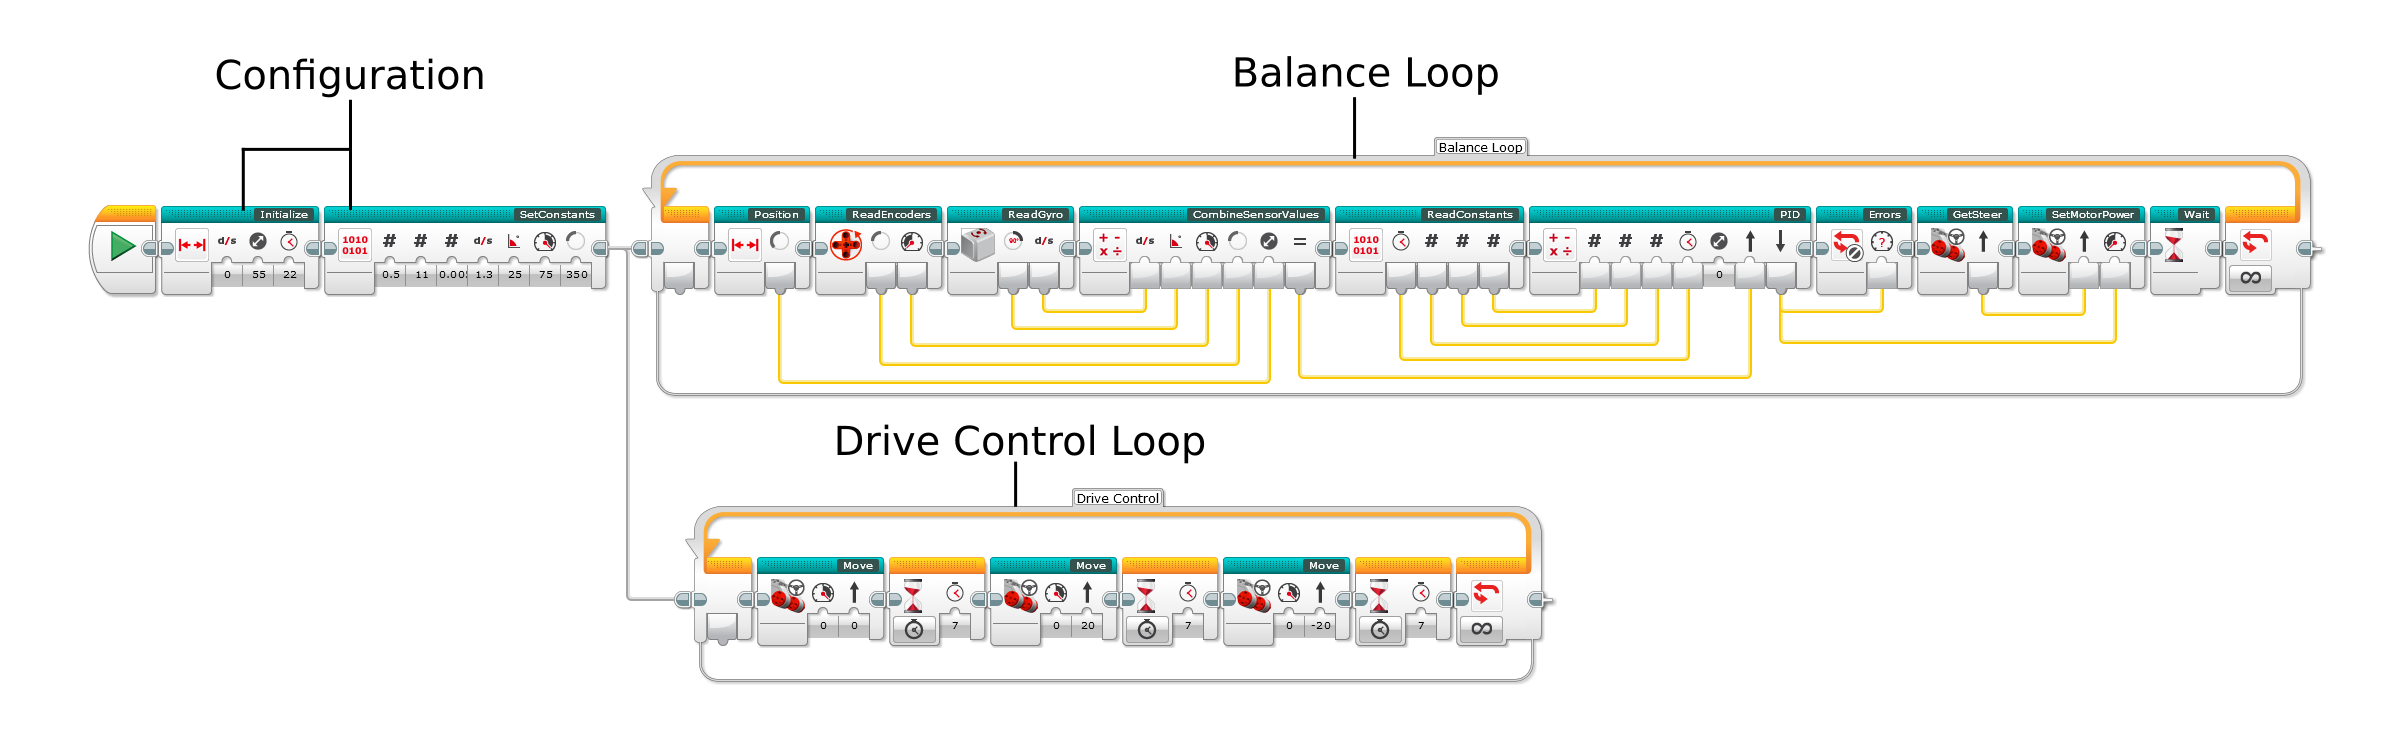
- The configuration blocks let you specify what the robot looks like, so that the robot knows how to balance. For example, the second setting of the first setting specifies the diameter of the robot’s wheels. The example programs come preconfigured with the correct settings for BALANC3R and Gyro Boy if you use the LEGO EV3 Gyro Sensor. If you use the NXT HiTechnic Gyro, change the Choose Sensor setting on the Initialize My Block to 1.
- The balance loop keeps the robot balanced. It measures and calculates the position and speed of the motors, and it determines the robot’s angular velocity (how fast it’s falling), as well as the robot’s angle relative to the ground. In turn, it uses this sensor information to calculate how to drive the motors in order to keep the robot up right. You won’t need to change any setting of the blocks in this loop.
- The drive control loop controls the speed and steering of the robot as it drives around a room using a simplified move block. This is the part of the program that you can easily customize to create your own program.
Step 4: Running the basic example program
You are now ready to download the example program to your robot.
- If you’ve built BALANC3R, begin with BALANC3R-Basics.
- If you’ve built Gyro Boy, begin with GyroBoy-Basics.
To start the program:
- Hold the robot upright with its wheels on the ground. Do not hold it tightly, but hold it loosely so that it’s just between falling forward and falling backward.
- Select the program and start it with the center button on the EV3 brick.
- You’ll first hear one beep. Keep holding the robot in place.
- You’ll then hear a double beep. Now release the robot and let it balance.
Your robot should now repeatedly balance in place for 7 seconds, turn right for 7 seconds, and turn left for 7 seconds.
Follow these steps if the robot doesn’t balance:
- If it doesn’t work on the first try, repeat the steps above a few times. After a while, you’ll know which is the correct “upright” starting position.
- Do not try to “help” the robot balance. Of course you should catch the robot before it falls, but trying to keep it upright with your hands is counter-effective.
- Verify that the cables have been plugged correctly according to the building instructions:
- The two Large motors should be connected to ports A and D. (If you’ve accidentally interchanged them, that’s fine. The robot will confuse left and right turns, but balancing is unaffected.)
- The Gyro Sensor should be connected to input port 2, regardless of which sensor you use.
- Verify that you’ve mounted the Gyro Sensor correctly according to the building instructions.
- Verify that the batteries are fresh.
- Verify that you are using the latest EV3 firmware (1.06H or 1.06E as of this writing).
Step 5: Running the second example program
If you’ve successfully programmed your robot in the previous step, it’s easy to try out the other example program for your robot. The robot balances in exactly the same way, but the robot’s movements are a little more interesting:
- BALANC3R-RemoteControl lets you control BALANC3R with the infrared remote, as shown in the video above. Just press the buttons on the remote to make the robot drive forward, backward, and turn. (You’ll figure out the controls quickly.) If you don’t press any buttons, the robot just balances in the same place.
- GyroBoy-AvoidObstacles makes Gyro Boy drive around a room while backing up from obstacles, as shown in the video above. Before you run the program, make sure that the white beams of both the robot’s arms point downward. The program relies on this starting position to make sure the Ultrasonic Sensor doesn’t detect the floor as an ‘obstacle’ when the robot’s left arm points downward.
Step 6: Customizing the program
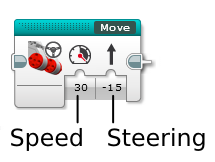
As you’ve learned earlier, the balance loop keeps the robot balanced while the drive control loop controls the robot’s speed and steering. The two loops run simultaneously, or at the same time. In the drive control loop, you use the Move My Block to specify the robot’s speed and steering, as shown below.
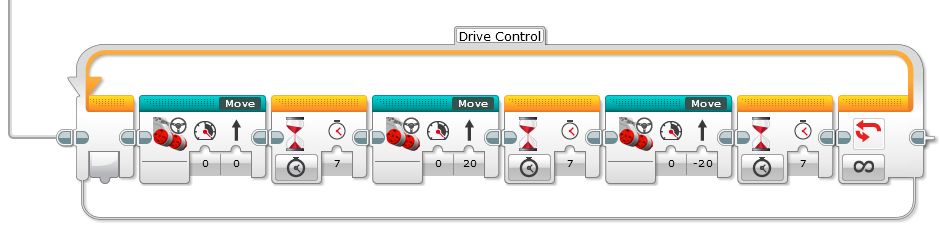
The robot keeps driving or turning at the specified rate until you run the block again with different values for speed and steering. The figure below shows the Move My Block in action in the basic example program you ran in step 4. The first Move block sets both steering and speed to 0, which makes the robot balance in place without turning. Next, a Wait block pauses the loop for 7 seconds, keeping the robot in the same place. Then, a second Move block sets the steering value to 20, making the robot turn to the right. After another 7 second wait, the robot starts tuning left by setting the steering value to -20.
Now that you’ve learned how to control the robot, it’s time to put your skills to the test with programming challenges. To solve these challenges, you can use the techniques from the LEGO MINDSTORMS EV3 Discovery Book, presented throughout chapters 1-9. Instead of using Move Steering blocks in On mode as in the example programs, you use Move My Blocks as shown above.
Challenges for BALANC3R:
- Make your robot drive around a room while avoiding obstacles with the Infrared Sensor in Proximity mode.
- Make your robot follow the Infrared Beacon. As you move the beacon around, the robot should follow you.
- Attach the Color Sensor in front of the robot’s wheels, and make the robot follow a line. You can print line following tracks for your robot from here.
Challenges for Gyro Boy:
- Make your robot drive in different directions based on the color it detects with the Color Sensor. To accomplish this, make the robot wait for the sensor to see either a yellow, red, green, or blue object. Then, make it drive in a certain direction for 3 seconds based on the detected color, before waiting for a new color signal.
- Make your robot show different types of faces/eyes on the screen as you interact with its sensors. Show an angry face if you press the Touch Sensor, show a happy face when you trigger the Color Sensor, and so on.
Step 7: Making your own balancing robot
In the previous steps, you’ve made BALANC3R or Gyro Boy balance on two wheels, and you learned to control it with the Move My Block. Now that you’ve got the essential components working, you’re ready to customize both your robot and your program. For example, you can turn BALANC3R into a life-like humanoid with arms, and make it talk to you. Or, go crazy and make any EV3 vehicle balance on its rear wheels. What about a self-balancing F1 style race car? Whatever you make, let others know in the comments below. Happy building!
Step 8: Further reading
In order to make this tutorial accessible for everyone with an EV3 set, I didn’t cover the details of the balancing algorithm. Rather, the design of this program makes it possible to control the robot even if you don’t know exactly how the balancing mechanism works.
However, many papers have been written about self-balancing robots, and I encourage you to read more on the subject as you explore the details of the EV3 program provided on this page. The balancing algorithm in this program is based on a Bachelor thesis written by Steven Witzand, which provides a good overview of the subject, along with Java source code that implements the balancing algorithm. In turn, this paper relies on the design and algorithm used in the NXTway-GS by Yorihisa Yamamoto, which you can study for further detail.

Thank you for posting this! 😀
I HATE DIS SO MUCH ITS BAD WRONG ROBOT BRO I NEED A DIF ONE LEAVE ME ALONE. F*** U
Hi, what is your point being so impolite?
Agree
F**** U too
where to put ultrasonic sensor giro boy (port)
I could tell you that, but why not check out the building instructions or the program? 🙂
How is the port setting of the Ultrasonic Sensor block in the example program configured?
How does the program work?
I have downloaded the project and run the balnc3r basic. The robot moves for a while but turns to error states so fast. What situations may cause the error occurs ? May you please explain how to fix the error ? Thx so much. Very appreciating your work.
Did you figure out the issue with Error message. I am having the same issue.
can you put a link to the program or show us where there is one
Yeah, what he said.
Hey, I didn’t sign a treaty for nuthin’!
You’re unintelligent, the robot just falls down and starts squirming.
Port 4
fey eat
Hey, Ian realy glad to read this.
Tank you very much for this nice work!
Thank you very much!
Everyday, in everyway, You’re getting better and better~
THANKS Laurens.
A bit of confusion though. In the ReadGyro block there is part of the program unconnected. Is that part redundant or should it be connected somewhere?
Could not paste an example picture here to make it visible 🙁
Ah, you’re right, thanks for spotting that.
It must have been something I experimented with but I forgot to delete it in the end. Since it’s not connected it shouldn’t affect your program, but you can delete it if you like.
Thank you, Laurens.
Good to be sure.
Could you share your project file? ( .ev3p -> .ev3s )
Well, I did. What else would be the point of this tutorial? 🙂
Please see Step 3.
well all the files I have are ev3p tried several times did you forget to change it. im on windows and all I get is balac3r program remotecontrol.ev3p I don’t know what to do can you help
well something is wrong I get this
BALANC3R-RemoteControl.ev3p
so can you fix this Ive done everything I can
Thanks Laurens! If you have times and is not too much troubles. Could you please do another tutorial on Configuration Block and Balance Loop? I am new too this and really want to learn more on this.
I might add more tutorials in the future. Meanwhile, you can find most of the information in the resources listed in step 8.
Hello,
Great project I think.
Program is quite easy to read.
Well done.
Thank you.
Thanks for this Laurens
A great project, and the balancing model works very well with the Lego Gyro Sensor. Now I must wrap a wet towel round my head and spend some time understanding the program. Thanks for the references to help with this. Did you find it difficult determining the kd ki and kp parameters for the pid?
Thanks Robin. The papers I referenced provide a way to calculate the constants, but I determined them by trial and error. However, I’ve been using these values since four years ago when I first wrote the program for the NXT. I’ve been tuning it since, and eventually I ‘translated’ it to EV3 to create this program.
Note that the other four constants in the configuration block are also very important. They determine by how much each sensor value contributes to the overall motor control.
Hello,
Followed the building instruction for Banlanc3r, updated my firmware to 1.06E, downloaded your code into EV3.. checked everything twice!
When I start both program for Balanc3r, I hear the single beep, then the two ones and then; the motor connected to port A goes -100% (backward)power continuous while the other is idle.
Do you have any hint on what can be wrong?
———————-
Hi,
Forget about my previous mail…
My gyro was dead 🙁 , tried with a new one and all works now.
No I need to tune the parameters…
BR
Al
The Gyro isn’t necessarily broken. It may just need to be recalibrated. To do this, unplug the sensor from the brick, and plug it back in. For the best results, this should be done while the robot lays flat on the ground or table, so that it doesn’t move during the calibration.
I’ll add this to the troubleshooting section.
The program does account for this by doing its own calibration, but the LEGO Gyro Sensor can be way off when it’s moving too much when you plug it in.
I did not want to tear my car down so I used sensors and motors from my NXT kit. To make the Balanc3r work, I had to rearrange a few items in your building instructions. When I executed the program, got the one beep, then 2 beeps and then the Robot started to balance, waited for 7 secs and then went straight forward at high speed, fell down and then stopped with “ERROR” showing on the screen.
Before delving into your program for learning,I will try your program using the formul3r car as the robot. If this fails, then I will finish reading your book and try building the robot according to your instructions.
Thanks for posting this, I’m rather new to mindstorms. I’ve ben working on translating the HiTechnic balancing bot program(NXT-G) to (EV3-G). I’ll keep working on it and compare it to your program (which works great!!) and see if one is better than the other. Thanks again!!!!!!!!!!!!!! P.S I tried your program with a bot like the Educator bot made from #31313, and a different bot of my own design and it still worked!!!! Is it okay if I post the link to here on Mindstorms Community and pics of your bot?
Great post. Thanks for your sharing.
Has anyone successfully gotten the Gyro Boy to follow the IR beacon?
As I have only one large motor is available for now, I made a single motor but 2 wheels robot base on BALANCE3R with small change on robot structure and program. It is able to keep stand stable and move forward/backward, but it cannot steer (of course it cannot). It is my first self-balance robot. Thanks Laurens!
One question, the ReadEncoder block contains one parameter 57.3. What this value means? Does it depending on robot structure? i.e. the robot is higher and bigger than BALANCE3R do I need to change this value?
Cool to hear you made a modified robot.
57.3 is 180 / PI. I use it to convert between degrees and radians. Whith the angles measured in radians, it is easier to calculate traveled distance and speed. (distance = turn angle * radius and speed = turn rate * radius.)
Hi
Is there any source code for ev3 self balancing in.Net or Java?
What does the ERROR message mean on the Gyro Boy Program? Reply quick. Pls.
My robot is not balancing and is always showing the error message 5 seconds after I start the program. I start it, it moves a bit then falls down and gives the error message.
Hi Laurens,
This is a great project !
I’ve been trying to make sense of the algorithm and implement it in a Matlab/Simulink environment. I just have a small doubt about the algorithm:
Where is the variable ‘old_steering’ defined ? I see that its being read in the ‘SetMotorPower’ block but can’t find where its been written.
Thanks,
Devansh
Hi Devansh,
I’m trying to make the self-balancing EV3 with mathlab/simulink but I can’t seem to make it work.. Wondering if you were able to make it work? And if so, could you please help me with it or send me the mathlab file?
Thank you!
Hi Davansh,
I am starting a 2 wheel projects with matlab/simulink like you state. I would like to use state feedback. May you share some of your advance with me.
thanks
luc
how do you make it spin and then move forward
Hi Laurens, I ported most of your basic balanc3r code to RobotC and posted it over in the RobotC forum, thank you for a great job, it worked almost out of the box after porting it… 🙂
That’s funny — I wrote the original code in RobotC, then “translated” it into the EV3 language 🙂
The RobotC code is here.
Thanks for a good program in EV3 language. After re-reading your answers and directions again, I finally got your balancing robot to run.
I run my robot on a rectangular (3ft by 6 ft) board with 4 inch walls. What I want to do is lower the ev3 Sensor from the top of the robot down near the wheels. Any idea if this will work without adjusting any of your parameters.
Next point is that I want to build the balancing robot using the VEX Cortex system. I believe that I can make a bigger robot using your code (robotc). I like to program in “C” type code.
Your book was a big help in getting me going with the EV3 system.
Hi Ronald,
Thanks for your feedback. Glad to hear the book was helpful as well.
Do you mean to lower the the Infrared Sensor? That should be possible without adjusting the code.
Best,
Laurens
Hello Laurens,
I love the sheer elegance of the Balancer and your text and visualization. Thanks for that. The code (balancing-robot.ev3) was easy to implement (just one change, where an ultrasonic sensor is depicted, in stead of the infrared had to be made). The robot is slightly more nervous than the qyroboy. Gonna see whether I can change that behavior.
Tom
Hi Laurens,
I’m trying to make the self-balancing EV3 with mathlab/simulink but I can’t seem to make it work.. Wondering if you were able to make it work with simulink? And if so, could you please help me with it or send me the mathlab file?
Thank you!
Nope, I haven’t tried this, sorry.
In the pid block I am missing the writing into the var prev_err.
Because this var pre_err is 0 it is not a pid but a pi block !!!!!!
hello Laurens,
Can you build a robot that can solve a maze?
Thank you very much for posting this balancing robot tutorial because i had trouble making the PID controller. Can you explain to me how the PID works?
I built my Gyro buy, loaded the Gyro Boy-Basic Tested it, and… there was first beep then second… i waited a little more and the robot wenta little right and then straight full speed forward falling down…
Hi Lauren’s,
I just got the home version of EV3. Your balancer was my first robot to build.
Thanks a lot for such a simple balancer to build. Took me 15 minutes at the most.
I downloaded your program to my Mac, then built and downloaded the code. It works beautifully!
Thanks,
Kevin
Hey Kevin!
Nice to hear from you. Glad the robot worked well.
How about making a pneumatic retractable support for the robot so it can rest occasionally and then begin move again? 🙂
Laurens
I love such challenges. Gonna start now
My son (7 1/2 years) build the Gyro Boy successfully except for one thing: the colour sensor does not respond to the colours on the stand (red, green, blue, yellow).
I’m at a loss as where else (I’ve been looking for several hours) to check. I did notice, however, that I don’t see a colour sensor anywhere in the downloaded program (balancing-robot).
Any suggestions?
Thank you very much!
Brian.
Hi Brian,
That’s correct. I didn’t use the Color Sensor in the example program, but the program was designed in such a way that you can add such features yourself.
I encourage you to look at the basic GyroBoy program to start with. You can use the Color Sensor to make the robot drive in different directions (Using the light blue Move blocks) when it sees different colors.
All of the balancing happens in the background, so you won’t have to worry about it.
To begin, try modyfing the wait blocks in the drive control loop. Currently, they wait for 7 seconds before changing the speed with the Move block. You could modify these Wait blocks to wait for a specific color, using Color mode. In this way, the robot will, for example, drive forward until it sees red, rather than driving forward for 7 seconds.
What a relief to hear you confirm what I saw. I was worried that I missed something.
Thanks very much!
Brian.
Great work! I just built the BALANC3R, and it works. It works as well as I do. That is to say, it is hesitant in it’s movements and keeps shifting it’s weight just like a person with Parkinson’s disease. When I hold down both forward buttons, it moves forward for about a second, and then slows. I guess it is catching it’s balance? Is this normal for the robot?
Hi, I was wondering if I could have some help? My BALANC3R won’t move when I try and control it with the remote. Any help would be appreciated.
Never mind, had infrared sensor plugged into wrong port :3
I’ve built the balancer robot, when I try running the program the wheels turn very quickly then I get an error on the brick 🙁
Any ideas anyone?
Be sure to double check the cables, and position the robot on the ground as indicated when you start the program.
Hi Laurens,
Fantastic job. Everything worked on first try!
Now I am tempted by the whole exercise to go back and learn all the control theory covered in the references you posted. Did you go through the references and derive all the equations yourself or just took the results and went from there?
regards,
At
I originally made this program using the previous generation of LEGO MINDSTORMS years ago, using a formula from the paper above.
Now I’m pursuing a MSc. degree in control engineering and actually learning all the theory behind it. It’s very exciting 🙂
Hi Laurens,
thanks for your feedback, the only problem was that I wasnt starting the robot off correctly.
Once I held it upright correctly after the beeps, then the robot was all ok staying upright and moving!
AWESOME work btw!
All my friends were very impressed!
Thanks once again
Paul.
Glad it’s working 🙂
Hi Laurens,
You did a great job! I’ve downloaded your EV3 code and realized that you’ve implemented both robots with support of 3 gyro sensors:
– Lego
– Dexter Industries
– HiTechnic
I’ve reviewed difference in the EV3 code between all three sensors. It seems that all differences are in a GyroRate block where for:
– Lego and Dexter Industries sensors you use gyro rate as is
– HiTechnic sensor you take raw value from gyro and divide on -4
Why am I explaining all this? Because I have an AbsoluteIMU-ACG gyro from Mindsensors. Thus I want to adopt (if necessary) your EV3 code to make BALANC3R with this gyro work.
I remember that one of your first balancing robots was built with AbsoluteIMU-ACG gyro. Perhaps, you can provide coefficients that are specific for Mindsensors gyro? Or should it work as Lego and Dexter Industries gyro out of the box?
Thanks in advance,
Andrey
Sorry, looks like not all blocks were properly displayed in a GyroRate block. Now I see that it’s much more calculations than I saw before… Now I lost any hope to simply reuse already implemented for all three sensors block.
It would be great if you can help me with this 🙂
Hello Andrey,
I’m in the exact same config, and same problem.
I found that using a factor of “-70” on the gyro Y reading produces quite good results, but not perfect, it falls after +- 2 seconds.
I’m not sure,but it seems that the mindsensor ACG is quite “slow” to react…
If someone can help us, it would be nice!
thanks!
owai
nobody has an idea?
🙁
i get either error or the programs dont run. I have the EV3 with updated firm. what would be the reason why its not working?
thanks a lot, it weas really helpfull
Hello.I am Daniel.I made my gyro boy.The program of yours is going BACK.What should I do?I almost did everything.
not balencing gyro boy……
Never mind,I built it wrong.
As I’ve seen with some, I built BALANC3R but kept getting ERROR on the brick after it ran quickly and fell over. I tried a dozen times or more with no success. I double check my build and firmware versions and all was correct. Then, out of the blue it worked once – I was so excited! What I learned over time is that the ERROR message occurs whenever the robot cannot find its sense of balance. For me, it is a very delicate procedure to place the robot at just the right position (every so slightly leaning backwards from an equilibrium position), so that when it starts running it balances itself. Also, I delicately hold it upright with the slightest amount of pressure, so as not to hinder its movement when it starts under its own power. Now that I’ve practiced, I can get it going correctly about 90% of the time.
I’m having the exact same issue – it just gives me the error message, but unfortunately I haven’t found the solution yet!
Hi Laurens, it’s Andre, from Brazil. First of all, thank you for sharing all the information with us, I’m sure you’ll have sucess in your MSc!!
I’ve built the robot according to your instructions, but I have an Dexter Gyro and I notice that the shared file is not completed for this sensor. Is it possible to you to help me make it work? How to complete the program and what should be the right values for kP, kI and kD?
Thank you a lot in advance!!
Hi Laurens,
I built and tried the GyroBoy and it works great. First I had forgotten to import the sensor blocks which resulted in a number of errors listed above: ERROR, fast moving backward (in my case), … Importing and activating the sensor blocks and restarting LabView took care of that. I’ve been looking at your code and come across variables(?) in grey programming blocks. The palette shows the standard blocks (green, yellow, blue, red, etc…) but no grey blocks. Can you tell me where they come from?
Thanks in advance.
Kind regards,
Frank
Hi Frank,
They are the inputs and outputs of My Blocks. You can learn more about these and how to make your own in my book 🙂
Laurens
Hi Laurens,
Ordered your book on march 19th (Standaard Boekhandel), got a message on march 30th that it had been sent (was on order from the distributor that long). Got another message on april 2nd that it had been returned damaged. Now still awaiting delivery (grinding teeth…). By no means your fault of course. Just to illustrate that patience is a virtue 😉
Anywho. We (Overpelt Lego Builders Club in association with KWB Koersel) had a build and show weekend a week ago where I showed the Gyroboy. Very well received! Eyecatcher and many questions.
Thanks for the excellent project!
Hi Laurens,
Received the book last friday. And I must say, definitely worth the wait! Excelent! Worthy of a hardcover! I’ve been dabling in IT since the late 70s (yes, last century) and have accumulated quite a library of related books. Yours belongs in the top few. Do you know if there is a Dutch translation available?
Thanks in advance.
Kind regards,
Frank De Hert
Thanks for both comments Frank, I appreciate it 🙂
Glad you got the book eventually. Oh how I wish I could have a hardcover edition, haha.
There’s not currently a Dutch version. I’d have to find a publisher who wants to publish it.
Laurens,
what does the (move) block consist of?
Is it just a steering block put in myblock form?
How can I make the BALANC3R go forward?
Hi,
I was able to build the BALANC3R and upload the basics code. It worked very well..I was even able to make changes to make it function how i would like to but the problem is how to save the new code that i generate. Whenever i open what i have saved, the changes i had made are no longer in the code. It reverts back to your code..
Help…
I love your book and your site!!
Thanks alot:)
Hi Eva,
When you download the code, make sure you save it to your computer in a known place, such as your documents folder, rather than opening it directly from the page (then it ends up in a temporary folder and you might loose the changes.)
Let me know if that helps.
Glad you like the book as well, thanks for sharing 🙂
I am trying to build self balancing robot using lego EV3 with RobotC platform. the sensor used is gyroscope and built in motor encoders. Can anyone provide me the source code for such a robot using ev3 and robotc?
Hello,
did anyone tried the MindSensor ACG gyro?
I have one, but can’t adapt it to work with Lauren’s code… 🙁
Thanks!
hello we have built this gyroboy robot but when we test i keeps falling over can you help us
thank you!
I DONT UNDERSTAND!!!!!!!
Hello, i have build Balanc3r using nxt motors set but with an ev3 brick and lego gyro. That means i had to modify the design, since the nxt motors are different in terms of both holes and axle alignment. I tried to maintain the sensor on the same vertical as the wheel axes, and the center of the brick on the wheel axle also. I am using 62.4×20 diameter tires so i set that up on the program (still trying to source some 43.2×22’s and rims for them). I have fresh batteries. I ditched the IR sensor for now, and disabled the move code. Basically i should have a Balanc3r that stands in place. The robot is started laying down, so the gyro is not drifting. I can also post some photos of it.
Every time i start the robot, it goes in only one direction (depending on how good i balanced it) and then goes ERROR. I have built the light sensor segway with a fair bit of success with the same makeshift lego set, but this one with the gyro is not as successful.
Any suggestions i could try (tune the parameters?)?
What do you mean by “The robot is started laying down”?
The robot should be held upright (see step 4.)
No, i means the brick itself is started laying flat, so there is absolutely no movement to offset the gyro. Once the brick has fully started, the program is run with the robot up-right.
I have rebuilt the robot into the GyroBoy, and it one works. I think i need to try and build the Balanc3r differently maybe.
Hi Laurens
I built the Balanc3r and im loving it but I was wondering if I wanted to use the same programme but build a larger scale robot with bigger wheels is that possible or do I need to change something in the code? I am not very good at Ev3 coding but im trying to learn :/. Thanks in advance
Hi,
I’ve been going through your balance loop because I like to figure out how things work and I must say that I am very impressed. I am currently trying to build a robot that balances on one wheel with the help of the my blocks you created here. There is one particular piece of the program that I simply can’t wrap my head around and was wondering if you could help. That is, the ReadGyro block. I simply don’t understand what’s going on at the beginning of the code and why. The following is the main question I have.
>>What does the ‘mean’ variable represent? I tried for so long and couldn’t understand why the mean subtracted from the current value gives the angular velocity. I thought the value outputted from the GyroRate block was the angular velocity itself. If you could shed some light on this I would really appreciate it. Thanks and always a fan 🙂
My color sensor is not working. Is there a reason in the program it shouldn’t work?
She didnt add it she explained it in one of the replies.
You have to do it on your own
I tried Balance3R-basics, but it reports “ERROR’ after a short beep with short move. My firmware version is 1.07E. Does it matter?
Using 1.07H Brick with ev3 Home Edition version 1.1.1, Lego Education set 44454, Gyro boy. Falls down with “Error” on the screen. I’ve double-checked what the students have built for the Gyroboy model and it seems ok. Would appreciate any help.
J’ai pris un grand plaisir à réaliser ce robot
un grand BRAVO !…
I built gyro boy and always when i run your program robot just starts going backwards i tried unplugging gyro but it didnt work.Please help! 🙁
Hi,
Do you have a tutorial for an inverted pendulum? I tried your BALANC3R robot without the wheels and attaching both motors to a solid frame hoping it would keep a 2 feet structure straight (90° degrees) but it didn’t work. I tried to modify your blocks but since I’m quite new to EV3 programming I did not understand most of it.
Thank you.
Hey Laurens, Great stuff! Love your work! Any chance you can share your ‘my block’ code? I’d really like to see the whole code so I can connect my theory with practice. I’m planning to build an inverted pendulum next and some other cool PID stuff i’ve learnt. 🙂
Would really appreciate your help, I’ll even chip you a few bucks for the effort.
Cheers
Marty.
Hey Marty,
You can see what’s in the My Blocks by double-clicking on them. Nothing to hide here 🙂
I’m also still working on some more documentation on the theory behind it.
Laurens
Hi,
Can I build the GyroBoy with my home version of EV3? 31313? I have purchased the gyro brick separately and made the Balanc3r robot.. but I would now like to make the Gyroboy. Can I just purchase the extra parts separately if more parts are required and not available in my Home version of EV3.
I have the same question. I like the gyro boy design, but have the EV3 home edition and purchased the gyro sensor separately.
Its not working :((((
Ive followed all your instructions for gyroboy
Hi,
My gyro boy goes backwards after it starts up. Why is it doing this?
My Gyro boy will not balance and the programming I am using is the one you linked. Once I stand him up and release after the second beep nothing happens except for him falling over and saying error I was super excited to build this but am not getting very frustrated. I have gone through all of the things that may be wrong but he just doesn’t seem to be working and I have followed all the instructions please help I need this robot to work for a huge school project and i was certain it was but now it is completely failing.
PLEASE REPLY!
Where is the program for the puppy
Where is the program for the puppy.
I believe you can find the program by following Step 3. At least i downloaded it from there.
this is nice
JUst curious… Is it possible to build the Gyro Boy using the Ev3 home edition and replace the ultrasonic sensor with the Infrared, and the color sensor with the light sensor? If so, what modifications do you recommend I make to the program?
Hello Laurens,
one question please: After I have downloaded the program BALANC3R-RemoteControl and executed, I have an error message in the EV3-Display.
The error message is only the word “ERROR”. My question is now: What means “Error” in this case? Are there any error codes?
Thank in advance,
Micha
Dear Laurens;
Built Balancer3 following directions explicitly, correct port connections, DL’d latest firmware 1.09h, plus project file and just get a couple wheel turns then ERROR msg.
80 yrs old, what am i missing ?
Any thoughts ?
Frustrating – so prompt reply appreciated.
Aubrey J
see my comment below
Does someone have the program in simulink ?
Does someone have this program in Simulink?
why are the program saying ERROR???
how to fix that
To all those getting ERROR: This means the robot cannot find its balance. Read carefully the instructions: the robot should be at its equilibrium when you start the program, which means that it should almost stand still if you leave it without starting the program. Then start the program, and at the first beep you should leave it and it will find its balance. This does not work every time, so try many times until you get it right. You will progressively learn how to start it.
Also, don’t forget to download and install the driver (or block) for the gyro sensor from the Mindstorms website as per the instructions in Step 2 above. Without the driver installed, the robot will never work, whatever you try.
And, I find that the support (Gyro-Boy building instructions steps 1 through 17) helps real well to keep the robot up right when starting the program.
As Fred said: the robot needs to be at its equilibrium when starting the program. It is at this time that the position of the gyro-sensor is zeroed. If this happens when the robot is e.g. leaning forward (even only one degree) the robot will always try to adjust deflections to that zero position, which is leaning forward. This will always end up in an ERROR status.
can you also show the program to keep a robot from turning using the gyro sensor
How does the wheel diameter change how the robot moves?
For some reason, my Gyroboy works for about one second and then it goes too fast and falls over…
Practical post . I was fascinated by the facts ! Does someone know where my company might be able to find a blank Calif dwc ad 10118 notice of offer of regular work form example to work with ?
Hi, there are only *.EV3P files in the downloaded ZIP, no *.EV3 project files. How to open the project?
There is no zip file. Some browsers recognize .ev3 files as .zip archives, causing it to display the .ev3p files within it. To solve this, save the program using the provided instructions in step 3.
OK, I got it. It works fine now. Btw, your site looks great!
Hi, i’m trying to get the Balanc3r with infrared remote control an extra ultrasone and Button sensor to make noise when someone comes close or say something when you push on the button.
But now it looks the balancing functions can’t keep up and the robot falls.
Is there a way to let them work together or is the processor not quick enough to calculated all the code?
When i watched the NXTway-GS balancing robot i noticed that is drives much faster then the balanc3r, is this possible with EV3 or not?
Thanx in advance,
Allan
Hi, I am retired from a technical profession and I discovered Lego and Mindstrom thanks to you book, with a lot of fun both for me and my grand children.
Thank you for your very interesting site!
I have built Gyroboy and made some modifications :
I have changed the position of the color detector so that it allows gyroboy to walk on a table without falling out of it. See here:
https://www.dropbox.com/s/4w139ciwmyzif51/Gyroboy%20on%20table.mov?dl=0
I also added the IR sensor to be able to drive Gyroboy.
Nevertheless, I tried to change the beep before the driving loop on your program example to have Gyroboy say: “Let’s go now!”, but it seems that it interrupts the balancing loop too long, because it makes it fall most of the times….
Is there a way to do this without interrupting the loop too long?
Hi, I’m a researcher in robotics and AI and I am interested in using this as part of my research, it’s a very well built controller!
I only have two questions that I don’t understand about the code used, if you don’t mind giving me some info?
1) When getting the motor speed and motor position values, you divide both by 57.3. Is this just a constant? Otherwise, what is the purpose of that number?
2) When you get the angular rate and use it in the running average, you use dt x 0.2. Why do you multiply it by 0.2?
Thanks a lot!
You may be interested in using (and referencing) my newer code instead (https://github.com/laurensvalk/segway/). It takes out a few superfluous steps still present in this code.
1) It’s 180/pi. Does that ring a bell? 🙂
2) It’s a parameter to set the update rate of the gyro offset.
Every time I run the program both large motors will suddenly run 100% for about 2 seconds and then they’ll stop. Then a message that says ERROR appears on the screen. Do you know how I can fix this? Any help would be much appreciated!
Oh, nevermind! I figured it out.
i got same problem, how to solve it
Hello,
I am a 4th grader teacher and we are very new to the EV3 set. We built the Gyro Boy and it turns on and seems to move fast and then an error message. We just updated the block today. Will that cause us problems?
Will the Gyroboy work without arms?
Thanks for this. I’ve really enjoyed making these. I have the 31313 set so I had all the bits for the Balanc3r . With a bit of modification and few other parts from an old Technic kit I also managed to make Gyro boy.
The Touch Sensor doesn’t seem to do anything. I’ve only had the Mindstorms a week or two so it is probably something I’ve done wrong.
Thanks again
Regards
Dave
Hello Laurens,
Great website!
But the program is a bit (much) too complicated for me. Can you explain the program in detail or provide a simpler one?
I love this program. Well done ! It changes from the classic Gyro Boy program !
Hi,
I am learning the code of gyro boy.
could someone tell that what the constant value 0.021 mean? and, how does the following express mean? why do we need to divide the power value by radius?
float powerA = (pwr_b * 0.021f / radius);
float powerD = (pwr_c * 0.021f / radius);
I appreciated someone can give me some hints.
Hello just wanted to give you a quick heads up.
The text in your content seem to be runnning off
the screeen in Chrome. I’m not sure if this is a
formatting issue orr something to do with browser compatibility but I figured
I’d post to let you know. The design and style look great
though! Hope you get the issue solved soon. Many thanks
Ev3 45544 gyro boy program not working ..
Kindly send the Gyroboy program..
How do you program your your boy to recognize colors?
For anyone having the problem where the Gyro boy will just zoom forward and topple over resulting in error, unplug the cable from the C port on the EVE Brick. Our girls all had the same problem and one did this by accident and it made it work 100%. Crazy I know but seems a lot of people have this problem and this is the first time I’ve seen someone post this solution, hope it helps!
Is there a description of what the constants mean?
I have repositioned the motors and use smaller whells.
So I changed the wheels diameter, but what else do I have to change, and how to calculate?
Right now, the robot just falls down….
great put up, very informative. I wonder why the other experts of this sector do not understand this.
You must proceed your writing. I am confident, you’ve a huge readers’ base already!
Estou usando o Hi Technic, no bloco do ev3, fiz todos os passos porém ele anda alguns segundos e logo aparece mensagem de ERROR e fica nisso
Your code was amazing! It worked right out of the box. I just started a Masters program in control systems myself and built the gyroboy to see if I could understand more about PID. I’ve only done line followers so far. Your Lego code looks fairly straight forward to understand so far in the basics section.
I notice you have a very high integral gain which I assume is causing the oscillations and long settling time when I push the robot. I just started playing with it trying to bring the Ki lower. Have to tried to tune for such scenarios like pushing the robot so that there woulda be less oscillation?
By the way, I put a little platform on top of the robot to hold my water bottle. Your code is able to compensate for the load and it runs just fine. Awesome!
Thanks for the contribution!
Chris
my bots gyro boy dose’nt works
it fall down every time and at every trys
How to change the Gyroboy move block input ports from A & D to B & C for another robot?
hallo mensen van het goede leven
BEAN BOY
bEAN gRL
Thanks for sharing this in such an organized fashion!
The robot always falls quickly and says ERROR on the screen. What should I do?
Where can I find the explanation of the balancing algorithm?
And the ultimate question is this….
If I am having real trouble understanding the balancing block, how can i explain it to my students? and if it is not meant for students to understand it, then what is the educational purpose of the Gyro Boy, I am not being any negative, but i really would like to know the answers to the above mentioned questions..
Thank you
i would begin with the gyro sensor.
or a weel from ur bycicle
Thanks for posting the program. It work great
Those of you who are having your robot fall down try restarting the brick but make sure it on the stand and it’s not moving when you start it. Also you might want to unplug and plug in the gyro sensor.
Maybe some one can help me?! I’m trying to add a basic loop that has the ultrasonic sensor detect a waving hand and then trigger sound to say hello and move the arms. It’s a basic program that works but when I add it to the basic gyro it program it causes the program not to work. When I unplug the ultrasonic sensor and run the modified program again, It works. It leading me to believe the intrasonic sensor is interfering with the balance program, but why? Any help please.
Hi, I’m new in EV3 programming… How can I open the files in the link? I get a zip file with plenty of ev3p files but no ev3 or ev3s files. Can anyone tell me how to open it with the Lego Mindstorms EV3 home edition?
Thanks for this guide. Works wonderfully!
Hello, pleas put here a “download the program”.
I run this program on my robot but I have a problem after few seconds is written error. thanks
Thank you so much! The gyro boy is working just fine!
Hi Laurens
I was trying building the balanc3r, but I just couldn’t get it to work. I built the same robot from the instructions, downloaded the program but when i ran the program, both motors just ran full speed in one direction and it fell over. I tried dozens of solutions, keeping the robot still when starting the EV3, or unplugging and re plugging everything – but still no luck so far.
Any tips?
Thanks for the awesome project.
Charles
It says error why?
hiiiiiiiiiiiii
Hay Laurens, My Gyroboy is not balancing like it should. When i start the program, it just falls. I got the latest firmware, checked the ports, but it just falls.
I got my robot to move, but after around 1 sec it says error and falls over even though it hasn’t hit anything yet. WHY???????? (Please help)