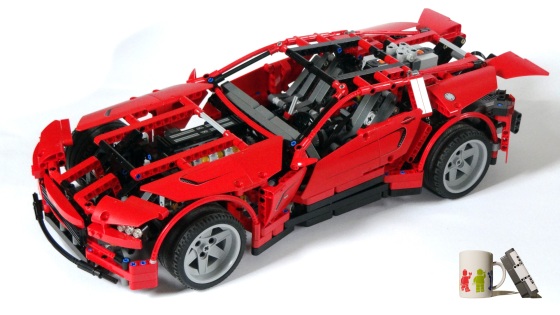
I got this set a while back and last week I finally found some time to build it. While building I couldn’t resist adding some extra features. I added 4 motors in total to make this car drive and steer with the Power Functions remote control. The video shows each of these additions in detail, so for more info, just sit back and enjoy.


Hi
That’s a very good modification and almost invisible.
I would like to make the same to mine… can you share more info on the construction? Thanks
Awesome work Laurens! You wouldn’t mind posting the instructions and the Bill of Materials here or put it as a bonus for the people that have your book and for your fans would you? 🙂
If you have something that extends my life by a factor 2 I might just have time to do that 🙂
If you have this set you can probably just give it a try. Maybe just the XL motor would do enough. That one is not so hard to attach.
Hey can you send the instructions
Hi Laurens, nice job on this modification. Good to see you made sure all original functions remain. Im modifing my 8070 right now, just ordered a XL motor, extra infra red receiver. Saw your post on the G1 unit, looks very nice and thinking ill order one. For now, you used 3 M-motors, but im a little confused about the 3rd one?
its , XL for rear wheels
1 M motor for the original functions
1 M motor for the front wheel steering
I assume you split the originel functions from 1 to two M motors? cant really see in your film. Anyway nice job.
Cheers,
John
Hi John,
All the motors were added for driving. I kept adding more because it wasn’t enough. So that is 2xM + 1x XL for driving, and then 1xM for steering, and 1xM for original functions.
Maybe I have a bad set, but even when you don’t add any motors, it takes a lot of force to turn the wheels. Looks like there’s a lot of friction. Is this the same for you?
Maybe you can start out with the XL motor. Maybe I just wasn’t starting in the right place. Good thing the XL motor is easy to attach. You just add one extra 20z bevel gear in the rear rectangular frame that holds the differential. You drive that gear with an XL motor with some gear reduction.
Regards,
Laurens
Well done!
Great job!
I pre-ordered your book a while ago and have built shotroller and the brick soterr. I mainly got the book for snatcher, but I am now missing a crucial part. Anyway cool robots. I posted a video of the brick soterr myself, giving all credit to you! I did modify the program to sort when I pushed the touch sensor and showed the original too!
Nice, that’s awesome! If you have the NXT 2 set, you may just want to continue your search, because it has all the parts you need 🙂
Hi
I like this modification.
I would like to make the same to mine… can you share more info on the construction? Thanks
Dear Laurens – I am planning to buy this set for my son and would plead with you to provide the extra parts required and the steps involved as I am not all that gifted and ‘switched on’ when it comes to Lego building. So would you please oblige?
Thank you,
Prabhat
Dear Prabhat,
Unfortunately I don’t have instructions for this model or a list of the the required parts.
hey laurens,
ev3 also have all the necessary parts?
thanks
No, unfortunately not 🙂
nice work
Hi Lauren’s
Where can I find the step by step instructions on how to get the remote control for the 8070
Thank you
Brayan