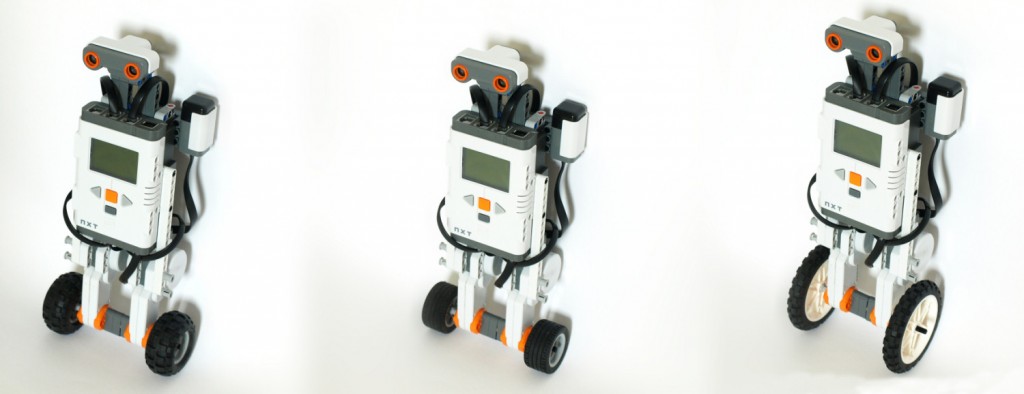
This is the basic Segway platform that you will use in each of the Segway tutorials. The robot is often referred to as ‘Anyway’, because you can build this robot with ‘Any’ version of Mindstorms NXT. Apart from a (any) NXT set, you will need a Gyroscopic Sensor for balance measurement: Either the HiTechnic Gyroscope, the Dexter Industries dIMU, or the Microinfinity Cruizcore. Consult your programming tutorial to see which sensor you should use. If you know, proceed to the building instructions below.
Anyway with a HiTechnic Gyro Sensor:
Anyway with a Dexter Industries dIMU:
Anyway with a Microinfinity Cruizcore:

Programming the Segway
For various tutorials on programming the Segway that you just built, use one of the following links.
- Programming the Segway with NXT-G (The LEGO Software, only with HiTechnic Gyro!)
- Programming the Segway with RobotC (More options, more advanced)
- View all programming tutorials


Hi Laurens-
Is there an NXT-G example program for the Dexter dIMU Segway? I’m trying to learn how to use it and need an example (the stuff on the Dexter site is more for displaying values rather than actual applications).
Many thanks!
It’s under construction as I write this. I’m working with Dexter Industries to help improve their gyro sensor block, which isn’t fast enough as of this writing.
For a Segway example, I would recommend to read the RobotC code. It’s tricky to see what’s happening in an NXT-G program with all their blocks and wires.
Thanks Laurens. I’ve been playing around with their sample NXT-G programs today and have picked up a bit more. Good idea on checking out the RobotC code. I guess that will push me to learn it sooner rather than later.
Cheers!
Any word on the Dexter dIMU version? RobotC is a payware system, so I’d like to stick with the stuff that comes for free with the NXT. Thanks!
The block that Dexter Industries provides is not fast enough, and the readings are not accurate enough, it seems.
RobotC is a very powerful tool for programming your robots, so it may just be worth the investment, depending on how often you plan to use it.
Hi Laurens
What a brilliant project! I am trying to teach myself Labview and wondered if you have also programmed this in Labview and, if so, would it be possible to have a copy of the code please.
Many thanks.
Hi Bob, Thanks! I did not make a Labview version, but there is a version made with the graphical LEGO MINDSTORMS Software. That language is based on labview, so that’s the closest I can get in this case.
You could ‘translate’ the code from there. I would however recommend to translate from the RobotC code. It’s much easier to read and it saves you from a lot of redundant code.
thank you….
Hey Laurens!
I have a question: Is it possible to do your Segway model using a light or colour sensor, from Lego Mindstorms NXT 2.0?
You could do that, but I do not have a ready made program for you in that case. Maybe you can try this Segway project with a Light Sensor and a ready for download program.
Thank you, Laurens!
how can i purchase this kit?
You can purchase the NXT 2.0 kit here. In addition you need the Gyro Sensor.
Hi Laurens,
Do you have any news on the dIMU’s NXT-G programming for the segway?
Everybody said that dIMU is a better sensor that Hitechnic, but for the regular NXT-G people, like me, it seems a waste. Prove me wrong please, my dIMU is waiting for it’s segway!
Best regards,
Bogdan
Hi Bogdan,
I made a version for the dIMU but I couldn’t get it stable at the time. I think I need to find new balancing constants (by trial and error) to make it balance again.
I could send you the current version of my program. Want to help me find those constants?
Let me know and I’ll send you an email.
Laurens
Hello again,
This is Edward, and i am wondering were you can get the programming block for the blue chip/gyro sensor in step 5 and where you get that gyro sensor in step 5.
Please email me if you can,

Thanks,
Edward
Edward,
Try this: [LINK]
Hello,
I built up your Segway and used the software and it works realiable.
Congratulations!
The reason i build up your segway is to get a feeling for a segway because i have to build a cheap version for some workshops.
So i used some Model Servos, one IMU-9 to detect angle and one Arduino.
Time showed it is not that easy!
I like your design, because you are just using one Gyro, calibration is just to correct offset and the balancing point will be found automatically compared to others who set the angle for upposition.
Would be great if you could answer the following questions:
1: Do you think your algorithm will also work without the use of sensors on the wheels? (will be more complex for just a standing segway)
2: How did you get all the parameters for kp, ki, kd and the error-factors? Trial and error? Matlab and simulation?….. I have played around with some pots to tune, but no satisfaction.
The goal for my segway is just standing upright. Moving or not doesn’t matter.
Greetings
Hannes
what Sensor is the black 1?
how much data can it hold
and how much is it
Hi,I wanted to know how you connect it using one wheel??it is not in the kit,, what is the diameter of the wheel u used??
I know this is pretty old, but do you still have the build instructions out there? I don’t see them linked on this page anywhere. I just dug out my old Mindstorms kits to show my son and found this page and thought this would be interesting to him. Thanks.