This tutorial will show you how to use and modify a standard NXT-G program to create a working LEGO NXT Segway balancing robot that you can customize as you like. I am assuming you will use the ‘Anyway’ platform. Once everything is up and running, you’re free to customize this one and create your own Segway.
Contents:
- Quick Start
- Requirements and preparation
- Understanding the Segway program basics
- Creating an extra profile for your Segway programs (Optional)
- Getting started: Balancing for the first time
- Skipping Calibration
- Moving, using other sensors, and avoiding objects
0. Quick start (if you don’t like to read)
Tutorials are fun, but of course you’re eager to get that robot to balance. If you want to figure it out on your own, just download and run the programs. If you’re stuck you can always return here.
If you’re more comfortable with step-by-step guidance, just follow the steps in order.
1. Requirements and preparation:
- LEGO MINDSTORMS NXT Anyway Robot (follow the instructions, then return here)
- Requires one NXT set (any version will work)
- Requires one HiTechnic Gyroscopic Sensor
- LEGO MINDSTORMS NXT-G 2.0 software. This is the standard LEGO software that comes with your NXT 2.0 set. If you have NXT 1.0 set software, go here to learn about how to upgrade.
- Segway Example Programs for HiTechnic Gyro. Unzip the archive. Don’t open the programs just yet!
2. Understanding the Segway program basics
Before moving on to programming the Segway, let’s have a brief look at one example program for the Segway. All example programs have the same basic structure consisting of three components:
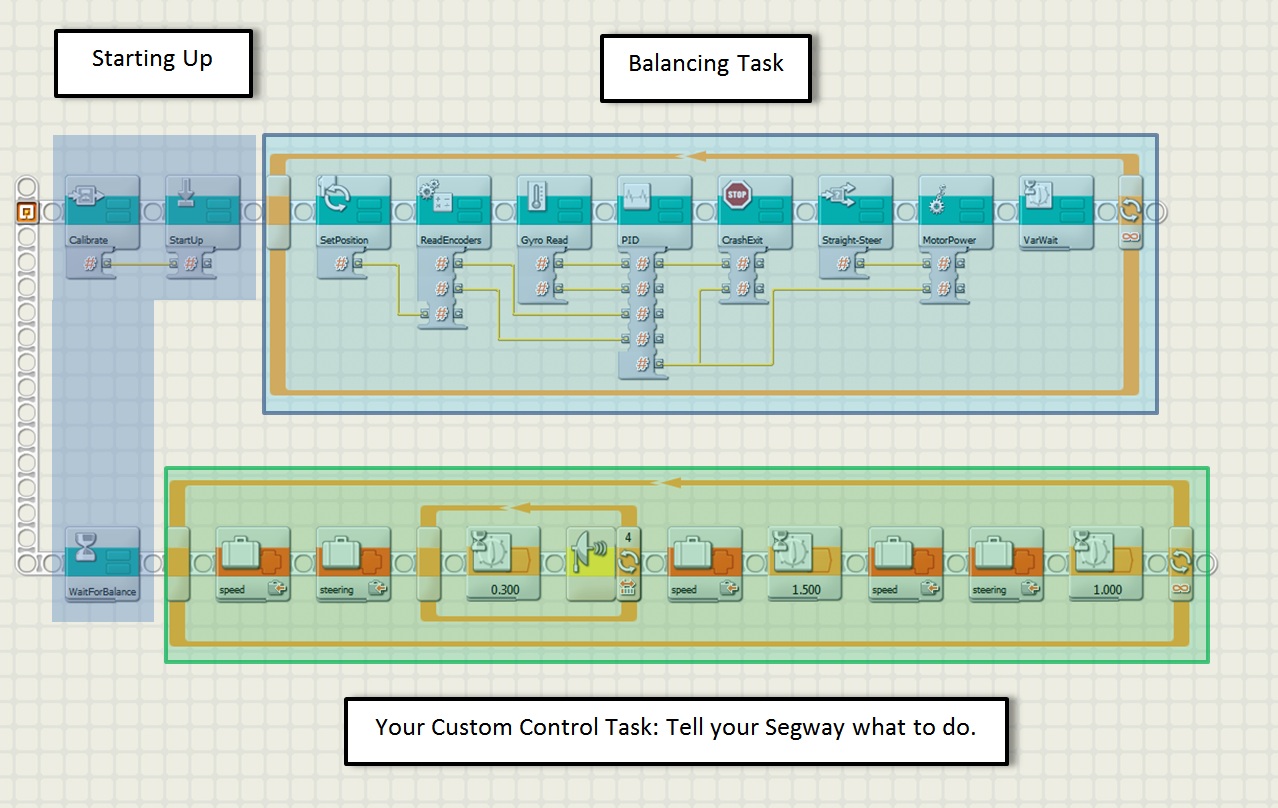
- Start up (dark blue): This configures your Segway and calibrates sensors if needed.
- Balancing task (light blue): This task does all the balancing work for you. You don’t have to do anything with these blocks.
- Your control task (green): This is where you can customize your Segway actions. You’ll learn all about that in a minute.
3. Creating an extra profile for your Segway programs (Optional)
The program you’ll soon open contains a lot of My Blocks. Nothing special here, but it can make your collection of My Blocks a little unorganized. You can create an additional ‘user profile’ in your programming environment by following the steps below. That way, your Segway programs will be kept separate from your other files. Next time you start the software to work on the Segway, only follow step 3 again. Note that creating a user profile is totally optional, but recommended.
4. Getting started: Balancing for the first time (and just stand still)
- Launch the NXT-G 2.0 software.
- Open “AnywayHT-Basic(ContainsMyBlocks).rbtx”.
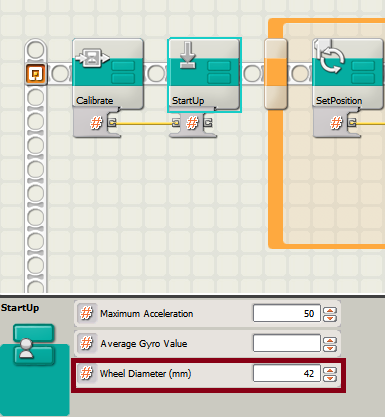
- Select the “StartUp” My Block. A configuration panel shows up as shown below. In the “Wheel Diameter (mm)” box, enter the diameter of the wheels of your robot, measured in milimeters. It is 42 mm for standard NXT 2.0 and 54 mm for standard NXT 1.0 wheels. Use only one of these two wheel types for now! Once everything else works, try other wheels if you like.
- Ignore the other settings for now!
- Download the program to your robot and run (Yes, it was that simple!)
- Follow the on screen instructions. Once it says <<Enter>>, you should hold it upright with its wheels touching the ground. Press the orange enter button and let go!
- Your Segway may drift a little backwards or forwards and then come to stand still. That’s okay.
- You shouldn’t try to hold the Segway, unless it is about to fall, of course. Holding it makes it unstable!
- Triple check you’ve put the cables right!
- (I’ll add more possible problems to this list when you find any, so let me know!)
5. Skipping Calibration
Calibration of the HiTechnic sensor is actually just finding the average sensor value. This average is different for every sensor but also depends on your NXT, the sensor port, and temperature. But once you find the value for your sensor, there’s no need to calibrate next time you start the Segway. To learn how to skip calibration, follow these steps:
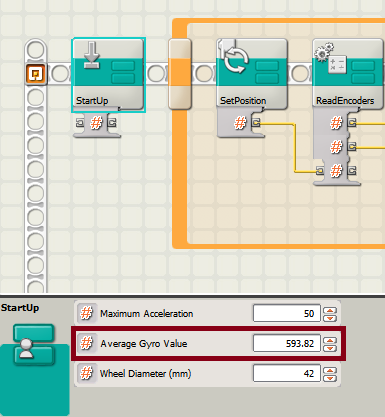
- When you ran the program in step 4, the NXT screen displayed something like: Average: 593.82 — with a different value, of course. That value is unique to my sensor. If you forgot what it was, just run the program and write it down somewhere.
- Look again at the ‘StartUp’ block. Enter the average value you found in the “Average Gyro Value” box.
- Delete the Calibrate Block. Your program should now look like the one shown below.
- Save and run the program again. It should do exactly the same as before, but skip calibration. So hold it up right with the wheels touching the floor, press enter and let go.
6. Moving, using other sensors, and avoiding objects
Hooray! If you’ve made it up here then you’re probably good to go ahead. This step will show you how to control your Segway to move about.
- Take another look at the overal program structure at the top of this page. Notice that in the basic program you just ran, there wasn’t a lot going on in your custom control task.
- For instant fun, run the “AnywayHT-Avoidance” program that you downloaded previously.
- You control the Segway by setting values for the ‘steering’ and ‘speed’ variables. The avoidance program illustrates this.
- Recommended speed is between -30 and 30. Negative numbers mean you go backwards. It will stand still on 0, and go forwards on positive speeds.
- Recommended steering is between -5 and 5, where negative numbers indicate a right turn, 0 is straight ahead and positive numbers are left turns.

- Important limitations:
- You must not use regular Wait for Sensor blocks! They consume too much CPU power and your Segway becomes unstable. Instead, use a Loop Block configured as a sensor with a normal Wait Block in it. This is shown in the example.
- Do not use Motor Blocks or Move Blocks to control motors B and C. You can use the Rotation Sensor Blocks, however you shouldn’t use its reset function.
- Always leave at least one Wait Block in the main Loop Block as you’ve seen in the basic example program.
- Come up with something creative. Make a Segway that follows lines, delivers drinks, picks up the mail, does your homework… And let me know!
The following video shows the Anyway in action. (The program on this robot is slightly different and it is using a different sensor, but overall the behavior is the same.)
Feedback
If you find any mistakes (even typos!) on this page let me know in the comments so this page can be made as clear as possible. Feel free to ask for help too, or share your own discoveries. I’ll add some of your questions to the troubleshooting section. If you help answer other people’s questions, you’ll make my day!