Last update: 10 November 2012
This tutorial will show you how to use and modify RobotC program code to create a working LEGO NXT Segway that you can customize as you like. Although you can use any type of LEGO NXT Segway with this code, I am assuming you will use the ‘Anyway’ platform. I recommend that you start here and modify your Segway only once you finish this tutorial — when you have a working Anyway Segway.
RobotC or NXT-G?
If you are not comfortable with RobotC or if you’re not sure what you’re doing, consider programming your Segway using the original LEGO NXT-G Software. Click here for a tutorial for NXT-G. Otherwise, proceed to programming the Segway with RobotC.
0. Quick start (if you don’t like to read)
Just download the programs and run. I’ve added comments to the programs that can replace this tutorial. You can always return here, if you like.
1. Requirements and preparation:
- LEGO MINDSTORMS NXT Anyway Robot (follow the instructions, then return here)
- Requires one NXT set (any version will work)
- Requires one of the following Gyroscopic Sensors. All sensors work equally well for this balancing application. When buying one of these, choose one that’s also suited for your other projects. I am not affiliated with any of these vendors.
- HiTechnic Gyroscopic Sensor
- Dexter Industries dIMU
- Microinfinity Cruizcore
- Mindsensors AbsoluteIMU-ACG (Sensor firmware 1.051. To update, contact Mindsensors support)
- RobotC for Mindstorms, version 3.54 or higher (successfully tested with 3.54.)
- If you are a new RobotC user, make sure you update the NXT firmware with RobotC
- RobotC third party driver suite, version 3.1.1 or higher (Install as per instructions on that site!)
- Segway Driver and Example code (Unzip all files in there to one folder on your computer)
2. Getting started: Balancing for the first time:
Before moving on to more advanced programs, we’ll first configure and run a simple program that will make the Segway balance and just stay in the same place.
- In RobotC, open “Segway-NoAction.c”. (This is in the folder you unzipped the downloaded archive to).
- Press F7 (Compile). Proceed to the next step if there are no errors. If this gives errors, this may indicate that you did not correctly follow the preparation steps.
- If you see (among other errors): **Severe*:Couldn’t open ‘#include’ file ‘drivers/DIMU-driver.h or MICC-driver.h, or similar, this means that the driver suite is not correctly installed. Consult the driver installation video.
- If you see (among other errors): **Severe*:Couldn’t open ‘#include’ file ‘segway-driver-lv.h, then the files in the zipped archive were not successfully unzipped to a single folder. Unzip again and retry.
- Now consider the following code fragment that you see in your example program:
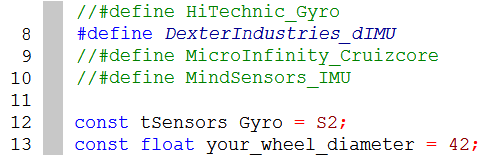
- You use one of the first four lines to tell the program which gyro sensor you have. Presently, this example is configured to work with the dIMU sensor from Dexter Industries. If you use the HiTechnic, Mindsensors or Microinifnity sensor, simply comment out the one from Dexter Industries and uncomment your sensor.
tSensors Gyro = S2;specifies which sensor port you connect your gyro sensor to. Plug your sensor cable into this port, or replaceS2byS1, S3 or S4.- Use
your_wheel_diameterto let your code account for the robot’s wheel diameter. The default is 42 mm for standard NXT 2.0 tyres. Use 56 mm for standard NXT 1.0 wheels. The large RCX tyres are 84 mm in diameter. - When you’re done, press F5 (Compile and Download Program).
- Start the program on the NXT brick (Make sure your batteries are charged!).
- If you configured the program to use the HiTechnic Gyro, follow the on-screen instructions
- If you use the IMU from Dexter Industries or Mindsensors or the Microinfinity Cruizcore , just hold your Segway upright and start the program. Then immediately let go.
- When you’re done clapping your hands in excitement, have a look at the main task of your code. This basic set of lines will form the core structure of your future programs based on this code.
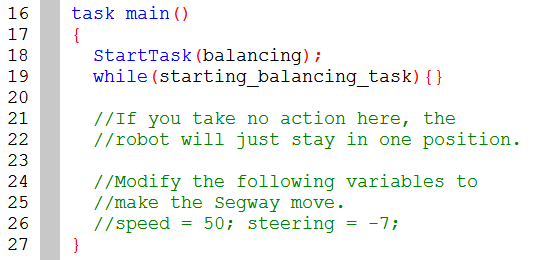
- For more explanation on how to control your Segway, proceed to the next section.
3. Driving, turning, and avoiding walls:
Now that you’ve successfully got your robot up and running, customize the code to make the robot move around. The Segway driver has been programmed so that you won’t have to worry about balancing. You can just run normal programs as long as you keep the following things in mind.
- To get going quickly, open and run “Segway-Explanation(Wall-Avoidance).c”. The comments in this file will tell you what you need to know for further customization.
- You can use regular loop, wait and other expressions but controlling movement should not be done with regular motor controls. Do not draw too much CPU power as it may conflict with the balancing task! That is, do not use empty while loops.
- There are three variables that control the Segway’s movement. Note that in using these, you are not directly controlling the motors, you’re just sending inputs to the actual control code.
- steering: This integer variable controls the tightness of the robot’s turn or its turn in place if not driving. There’s no strict limit here, but take steering = -20; as a sharp left turn, -10 as a soft left turn, 0 as no turning, and 20 as a sharp right turn.
- speed: This integer variable makes the Segway drive. Its value is of the same order of magnitude of regular motor speed. For example, speed = 50; will make the Segway go forward, 0 is stand still, and -30 is an example of driving backwards.
- acceleration: This integer controls the maximum acceleration your robot will do. If your speed is, say, 50 (set previously) and then you specify -10 as your new speed, this doesn’t happen instantly. When acceleration is set to, say, 30, it would take 2 seconds to accomplish the described new speed (50 – 30*1 – 30*1 = -10). If you’re unsure about this one, just don’t modify it and you’ll be fine.
- Your robot will keep on doing what you specified it to do until you specify a different action (different values of speed and steering)!
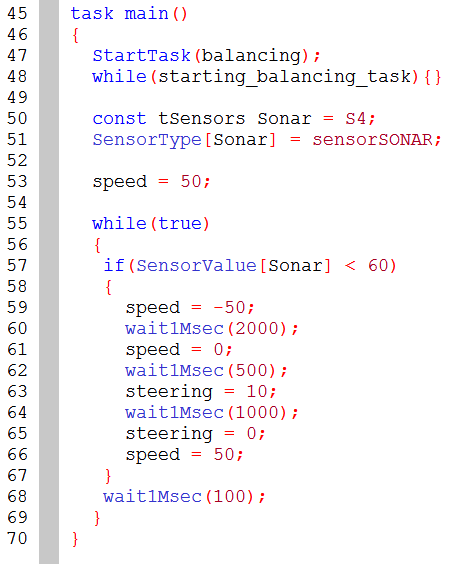
The following video shows the Segway wall-avoidance program in action.
Optional: Using the built-in Motor Encoders:
You are not allowed to control motors B and C in your program, but it’s still perfectly fine to read the motor encoders so you can do your own position control.
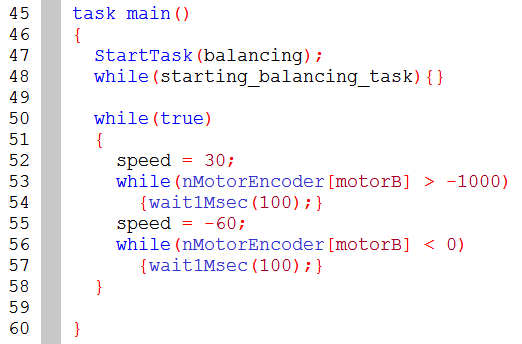
- Run the “Segway-Encoders.c” example program. The robot will drive back and forth repeatedly between its starting position and another position.
- Because the NXT motors are oriented ‘in reverse’, you should take into account the target position of the encoder. When you have speed set positively to go forwards, the encoder value will decrease. The example program illustrates this.
- If you use while loops for polling your sensor, be sure to add Wait statements (e.g. 100 mSec, although you *can* go lower) in the loop to save CPU power. This way, you won’t affect the balancing control task too much.
Optional: Tuning the PID Controller for improved balance
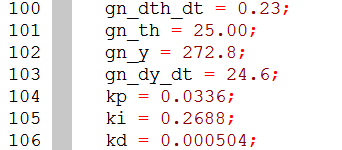
If you want to further customize the code without going into too much detail, you can do so by modifying a few variables that strongly influence balancing behavior. You can modify their values to change this behavior. This is useful if you want your robot to respond faster to disturbances, or if you are building a robot different than the Anyway. See these values below. You can change these inside the driver file, or in your main control code (they are globally accessible).
The Segway uses a PID controller to keep balance. Four physical signals are repeatedly measured and controlled to stay closely to zero at all times. These signals are:
- Robot angle relative to perfect balance (angle theta, or short: th)
- Robot angular velocity: change of angle in time (dtheta/dt, or short: dth_dt)
- Motor encoder position: position of the wheels (position y)
- Motor encoder speed: change of position in time (dy/dt, or: dy_dt)
Ideally, when they’re each zero, the robot stands perfectly still and upright (take some time to think about this!). In reality, they will always vary in time. Variance relative to the desired zero position could be considered as an error. The error is the added total of these four error signals, each multiplied by a relative importance factor (a gain). After all, staying upright is more important than staying in one place. You change the gain (short: gn) values to increase or decrease the relative importance weighing factors. They are the first four values in the illustration below.
Having established the total added error, we want to keep the total error close to zero. To do this, we use a PID controller. Roughly speaking, this means the power applied to the driving motors is the sum of the total error (Proportional), the accumulated error in time (Integral), and the change of the error in time (Derivative). Again, each of these are multiplied by a relative weighing factor: kp, ki and kd respectively. These are the last three values in the illustration.
Although the exact theory goes much further than this description, I encourage you to experiment with these values to see how you can change the balancing behavior. Don’t worry about losing the original values — you can always download a fresh copy of the driver file on this page.
Feedback: Help improve this tutorial
Did you find this tutorial useful? Let me know in the comments. If you run into problems, let me know as well so I can improve the tutorial where necessary.
Bibliography
The very first version of this code was inspired by ‘Coordinated LEGO Segways’ by Steven J. Witzand. You can find a very informative thesis and Matlab/Java code here.